

Can You Use Line App As Text
Help
- Android
- iOS
- Windows
- Android Lite
- Mac
- Chrome
- iPad
About Chats
The Basics
There are two ways to start a chat.
1. On your Friends list, double-click the person you want to chat with.
2. On your Friends list, control+click (right-click) the person you want to chat with then click Chat.
Thank you for your feedback.
Was this page helpful?
Yes No
To delete your chat history, please follow the steps below.
1. Click Chat.
2. Control+click (right-click) the chat you want to delete.
3. Click Delete.
Thank you for your feedback.
Was this page helpful?
Yes No
To save a chat:
1. From the main menu, click Chats.
2. Click or double click the chat you want to save.
3. Click the menu icon at the top of the screen.
4. Click Save chat.
Note: Only the messages that currently appear in the chat will be saved.
Thank you for your feedback.
Was this page helpful?
Yes No
You can send photos, videos, documents, and audio files.
Unsupported file types will be automatically converted to zip files.
Thank you for your feedback.
Was this page helpful?
Yes No
To keep a chat displayed on top:
1. From the main menu, click Chats.
2. Double click or right click the chat you want displayed on the top > Open in separate window.
3. Click the menu icon at the top of the screen.
4. Click Keep window on top.
Thank you for your feedback.
Was this page helpful?
Yes No
To change the order in which your chats appear:
1. From the main menu, click Chats.
2. Click the arrow icon to the right of the search field > Unread messages or Time received.
Thank you for your feedback.
Was this page helpful?
Yes No
You can take screenshots and send them to other users or save them.
To send a screenshot:
1. From the main menu, click Chats.
2. Select the chat in which you want to send a screenshot.
3. Click the screenshot icon at the bottom of the text box.
4. Drag and select the area you want to take a screenshot of, then click the check mark icon.
5. Press Enter or Alt + Enter (Command key + Enter for Macs) to send.
To save a screenshot:
1. From the main menu, click the screenshot icon.
2. Drag and select the area you want to take a screenshot of, then click the save icon.
3. Choose where you want to save the screenshot and the file name, then click Save.
Note:
- You can send up to 20 screenshots at a time.
- To cancel taking a screenshot, press the Esc key.
- In some cases, such as with official accounts, the screenshot icon may appear grayed out. This means the feature is not available.
Thank you for your feedback.
Was this page helpful?
Yes No
The suggest feature displays stickers and emoji that match the text you enter, letting you quickly choose the sticker or emoji that you want.
Note: Some stickers and emoji are not compatible with this feature.
To use the suggest feature:
1. At the bottom of the main menu, click "..." > Settings.
2. Click Chats.
3. Under Sticker suggestions, check the box next to Display suggestions.
If you want to add a language to use with the suggest feature, click the download icon next to that language in the Add languages column. The languages you've already downloaded appear in the Language column.
Thank you for your feedback.
Was this page helpful?
Yes No
To change the Send key for chat messages:
1. At the bottom of the main menu, click "..." > Settings.
2. Click Chats.
3. Under Chats, select your preferred setting next to Send key.
Thank you for your feedback.
Was this page helpful?
Yes No
You can insert line breaks using one of the methods below.
• If you've set the Enter key as your Send key, press Shift + Enter to insert a line break.
• If your Send key is Command + Enter, press Enter to insert a line break.
Thank you for your feedback.
Was this page helpful?
Yes No
This feature scans text in photos so that it can be copied and shared (e.g. in chats, in Notes).
You can also translate scanned text. Use the instant translation feature to translate the text directly on an image.
To scan text, send the image or screenshot with the text you want to scan in a chat, and then use one of the methods below:
• Right-click the image with the text that you want to scan, then select Scan text.
• Click " [A]" (the Scan text icon) in the "Capture screen" editing menu.
• Click " [A]" (the Scan text icon) at the bottom right of the image viewer.
To translate text, click Scan text or " [A] " (the Scan text icon) and follow the steps below:
1. Select the original language from the left drop-down box, and the target language from the drop-down box on the right.
2. Click Translate.
To share the text in other chats or in Notes, click the Forward icon at the bottom of the screen.
If you want to replace the writing in an image with translated text, use the instant translation feature.
To use instant translation:
1. Select the original language from the left drop-down box, and the target language from the drop-down box on the right.
2. Turn Instant translation ON.
You can also copy or download the image with the instant translation applied using the icons at the bottom of the screen.
Note: If you're using the feature for the first time, the original and target languages will automatically be selected based on the language in the image and the language that you have set on LINE for PC. You can change the original and target languages as needed before making a translation.
The following languages can be set for translation.
Original languages: Chinese (Simplified and Traditional), English, Indonesian, Japanese, Korean, and Thai
Note: We plan to make other languages available in the future.
Target languages: Arabic, Chinese (Simplified and Traditional), English, German, Hindi
,Indonesian, Japanese, Korean, Myanmar language
,Persian, Portuguese, Russian, Spanish, Thai, and Vietnamese
Note: Depending on the original language in the image, the number of translatable languages may differ.
Thank you for your feedback.
Was this page helpful?
Yes No
This feature lets you scan QR code images to check, copy, and access their URLs.
You can use Scan QR code with one of the methods below.
If the QR code image was sent in a chat:
Use either of the following steps.
• Right-click the image, then click Scan QR code.
• Click the image > Scan QR code (the bar code scanner icon) at the top right of the screen.
If the QR code image is on a website or somewhere else outside of LINE:
1. At the bottom of a chat, click Capture screen.
2. Take a screenshot of the QR code.
3. Click Scan QR code (the bar code scanner icon) that appears at the bottom.
After you've scanned the QR code, click Go to URL at the bottom of the screen that appears to access the link, or click Copy if you want to copy the URL.
Thank you for your feedback.
Was this page helpful?
Yes No
To translate a chat message:
1. Open a chat and right-click the message you want to translate.
2. Click Translate.
3. Select the original language from the drop-down box on the left, and the target language from the drop-down box on the right.
Note: If you selected Detect language, the original language will be determined automatically.
4. Click Translate.
Chat messages can be translated to and from the following languages:
Arabic, Chinese (Simplified and Traditional), English, German, Hindi, Indonesian, Japanese, Korean, Myanmar language, Persian, Portuguese, Russian, Spanish, Thai, and Vietnamese
Note: Depending on the original language, the number of translatable languages may differ.
Click the copy icon at the bottom of each language screen to copy the content, or click the share icon at the bottom of each language screen to share the content with other chats/save it to your Notes.
Thank you for your feedback.
Was this page helpful?
Yes No
To use stickers or emoji that you've purchased:
1. Click the emoji (smiley face) icon at the top left of the message entry field.
2. Click the stickers/emoji you purchased to download them.
Thank you for your feedback.
Was this page helpful?
Yes No
You can check which stickers will expire soon or have already expired from your sticker selection list in a chat.
Stickers with a yellow badge will expire within 10 days.
The number of days remaining will appear at the bottom of the sticker tab.
Stickers with a red badge have already expired.
They will be deleted automatically 20 days after the expiration date or when you tap the sticker tab and move to another tab.
Thank you for your feedback.
Was this page helpful?
Yes No
To share a message, photo, video, or file to a friend:
1. Open a chat room.
2. Click Share under the photo, video, or file you want to share.
Note: To share messages, right-click the message you want to send, then click Share.
3. Select who you want to forward the content to, then click Share.
You can share photos, videos, and files by dragging and dropping them to an open chat or a chat in your chat list.
Thank you for your feedback.
Was this page helpful?
Yes No
You can use text formatting when you enter your messages in a chat. See below for a list of the available formatting options and information on how to use them.
Note: Your messages will appear formatted after you send them in a chat.
• Bold
Enter a half-width or full-width space and a half-width asterisk (*) before and after a word or phrase.
Example:
Wanna have the birthday party *tomorrow night*?

• Italic
Enter a half-width or full-width space and a half-width underscore (_) before and after a word or phrase.
Example:
_Yeah!_ Let's all meet at my place.

• Strikethrough
Enter a half-width or full-width space and a half-width tilde (~) before and after a word or phrase.
Example:
How does ~3:00~ 5:00 sound for today's appointment?

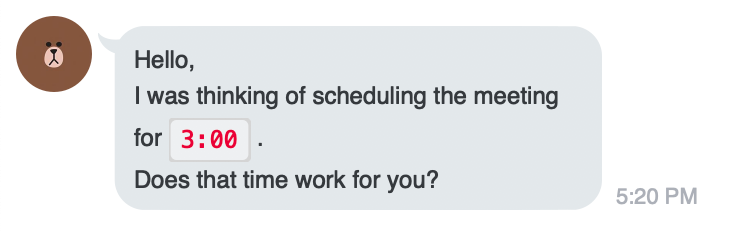
• Emphasizing text
Enter a half-width or full-width space and a half-width backtick (`) before and after a word.
Example:
Hello,
I was thinking of scheduling the meeting for `3:00`.
Does that time work for you?
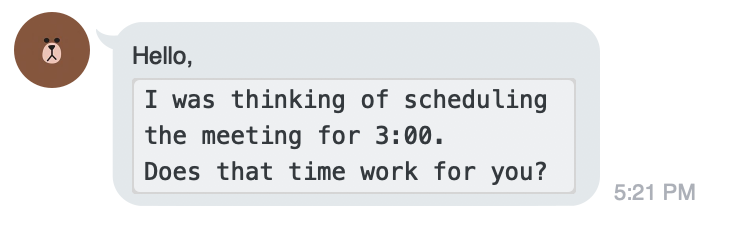
• Emphasizing paragraphs
Enter a half-width or full-width space and three half-width backticks (```) before and after a sentence.
Example:
Hello.
```I was thinking of scheduling the meeting for 3:00.
Does that time work for you?```
Thank you for your feedback.
Was this page helpful?
Yes No
To hide a chat:
1. From the main menu, click Chats.
2. Right-click the chat you want to hide.
3. Click Hide > Hide.
Thank you for your feedback.
Was this page helpful?
Yes No
To display a hidden chat:
1. Click Friends > the relevant friend or group from Groups or Friends.
2. Click Chat from the pop-up.
You won't be able to display a chat with someone if they don't appear in your friend list for one of the following reasons:
• You haven't added them as a friend on LINE.
• You deleted them from your friend list.
• They have deleted their account.
Thank you for your feedback.
Was this page helpful?
Yes No
Follow the steps below to create a group from a multi-person chat.
1. Click the menu icon at the top of the chat.
2. Click Create a group.
3. Select the friends you want to add and click Next.
4. Enter a name, set a profile photo, and then click Create.
Note: Messages from the multi-person chat will not be transferred to the group. To view your past messages, you'll still need to check the multi-person chat.
Thank you for your feedback.
Was this page helpful?
Yes No
Multi-person chats have been integrated into group chats, so you can now use the Notes and Albums features that were previously unavailable in multi-person chats.
If you want to create a group that doesn't require permission from members to join (like a multi-person chat), turn ON Members join automatically when creating a group chat.
If you have any existing multi-person chats, you can continue using them.
For the steps to create a group from a multi-person chat, see this Help article.
Thank you for your feedback.
Was this page helpful?
Yes No
You can react to chat messages (sent by you or your friends) by following the steps below.
Note:
- You can't react to messages that are more than seven days old.
- Reactions are available with LINE version 7.3 and later.
To react to a message in a chat room:
1. Move your mouse cursor over a message and click the reaction (smiley face) icon.
2. Select a reaction.
To react to a photo from the photo viewer:
Note: Reactions cannot be made to video files.
1. Click the reaction (smiley face) icon at the bottom of the photo viewer.
2. Select a reaction.
To change/delete a reaction in a chat room:
1. Move your mouse cursor over a message and click the yellow reaction (smiley face) icon.
2. Click the same reaction that you chose before to delete it, or change your reaction by clicking a different one.
To change/delete a reaction from the photo viewer:
Note: Reactions cannot be made to video files.
1. Click the yellow reaction (smiley face) icon at the bottom of the photo viewer.
2. Click the same reaction that you chose before to delete it, or change your reaction by clicking a different one.
To see who reacted to a message/photo:
Click the reaction icon at the bottom of a message or the photo viewer to see all of the reactions.
Thank you for your feedback.
Was this page helpful?
Yes No
If a chat message you sent doesn't appear as read and nothing else appears by it, it may be due to one of the following reasons.
Your network connection is unstable
With an unstable network connection, it may take some time for a chat to show up as read.
The recipient didn't see the message due to their use of the LINE app
If the person you sent the chat message to changed devices, reinstalled LINE, or accidentally deleted their chat history before checking the chat, they may not have noticed that they received the message. If the read mark still doesn't appear after some time has passed, try sending the message again or asking the person if they received it using a method other than LINE.
If an icon appears next to the chat message you sent, check its status by referring to this Help article.
Thank you for your feedback.
Was this page helpful?
Yes No
If there is an issue with a chat message that you sent, one of the following icons will appear. (Messages that were sent successfully will have no icon or the read mark next to them.)
Left-pointing arrow icon
This icon may appear if your network connection is unstable. Try sending your message when you have a strong network connection.
Resend icon
If your message couldn't be sent due to a network error, a button to resend it will appear. After letting some time pass, try sending the message again by clicking the resend icon > Resend.
Exclamation point icon
This icon appears next to messages that were sent while an error was occurring with the server for sending/receiving messages. After letting some time pass, try sending the message again by clicking the exclamation point icon > Resend.
Thank you for your feedback.
Was this page helpful?
Yes No
Notifications
To turn off sound notifications:
1. Click "..." > Settings.
2. Click Notifications.
3. Uncheck "Notify by Sound."
Thank you for your feedback.
Was this page helpful?
Yes No
To turn off pop-up notifications:
1. Click "..." > Settings.
2. Click Notifications.
3. Uncheck "Notify by Pop-Up" under How to Notify.
Thank you for your feedback.
Was this page helpful?
Yes No
You can turn off notifications for a specific chat using one of the methods below.
To mute notifications from a chat:
Click the menu icon at the top of the chat > Mute chat.
To mute notifications from your chat list:
1. Right-click the chat that you want to turn off notifications for.
2. Click Mute chat.
Thank you for your feedback.
Was this page helpful?
Yes No
To turn all notification settings ON or OFF, follow the steps below.
To mute all notifications:
On the main menu, click the speaker icon.
To unmute all notifications:
On the main menu, click the speaker icon with a dash through it.
Note: You can also configure your notification settings from the main menu by clicking "..." > Settings > Notifications.
Thank you for your feedback.
Was this page helpful?
Yes No
Posts
Notes is a message board feature that can be used by all of the members in a group. Use it to share important information along with stickers, images, videos, and URLs. You can also post pictures in Albums.
If you have a message that you don't want to get lost in your real time chat, use this feature to make sure people see it!
Thank you for your feedback.
Was this page helpful?
Yes No
Creating notes is a basic feature available to all of the members in a group.
Note:
- You can start using Notes after joining a group.
- When you create a note, it will appear as a new post.
If you're not already in a group, create one and invite some friends to start using this feature.
Thank you for your feedback.
Was this page helpful?
Yes No
You can view group notes using one of the methods below:
• Click the group's profile photo > the Notes icon.
• Click the Notes icon at the top right of the group chat.
Thank you for your feedback.
Was this page helpful?
Yes No
To create text that can be shared with other members in a group:
1. From the chat room or profile of the group of your choice, click the Notes icon.
2. Click New note.
Thank you for your feedback.
Was this page helpful?
Yes No
You can attach stickers, images, videos, web links, and more in your group notes.
Stickers/images/videos
Up to 20 stickers, images, or videos can be attached per post. In addition to content saved on your device, you can also attach images and videos in chat rooms by dragging them to a note's post screen.
Links
One web link can be attached per post.
Sound/animated stickers
One sound/animated sticker can be attached per post. These stickers cannot be attached along with ordinary stickers.
Thank you for your feedback.
Was this page helpful?
Yes No
To edit or delete a note in a chat, follow the steps below.
Note: You can only edit or delete notes that you created.
To edit a note:
1. Click the note you want to edit.
2. Click "v" at the top right of the note.
3. Click Edit.
4. After you've made your changes, click Post.
To delete a note:
1. Click the note you want to delete.
2. Click "v" at the top right of the note.
3. Click Delete.
4. On the confirmation screen, click Delete.
Thank you for your feedback.
Was this page helpful?
Yes No
When a new group note is posted a pop-up notification will appear.
Thank you for your feedback.
Was this page helpful?
Yes No
Albums
To create an album:
1. Click the menu icon at the top of the chat screen > Albums.
2. Click + Create album.
3. Enter a name for the album and click "+".
4. Select the photos to add to the album and click Open.
5. Click Post.
Note:
- You can enter up to 50 characters for an album name.
- If you don't enter an album name, the name will be the date the album was created by default.
- The same album name cannot be used more than once in the same chat.
Thank you for your feedback.
Was this page helpful?
Yes No
You can save an entire album at once or save photos individually.
To save an album:
1. Click the menu icon at the top of the chat screen > Albums.
2. Click the album you want to save.
3. Click Save all.
4. Select a folder to save the album to, then click Select folder > Save.
To save photos individually:
1. Click the menu icon at the top of the chat screen > Albums.
2. Click the album you want to save photos from.
3. Hover over the photo you want to save with your cursor and click the download icon.
Note: You can also select multiple photos by clicking the check icon at the top right of photos.
4. Select a folder to save the photos to and click Save.
Thank you for your feedback.
Was this page helpful?
Yes No
To add photos to an album:
1. Click the menu icon at the top of the chat screen > Albums.
2. Click the menu icon to the right of the album name > Add photos.
3. Select the photos to add to the album and click Add photos.
Thank you for your feedback.
Was this page helpful?
Yes No
To delete an album:
1. Click the menu icon at the top of the chat screen > Albums.
2. Click the menu icon to the right of the album name > Delete album.
3. Click OK.
Note:
- When an album is deleted, a notification is sent to the chat saying who deleted it.
- Photos cannot be restored from an album once it has been deleted.
Thank you for your feedback.
Was this page helpful?
Yes No
To delete a photo from an album:
1. Click the menu icon at the top of the chat screen > Albums.
2. Double click the photo you want to delete.
3. Click the menu icon at the top of the screen > Delete > Delete.
When a photo is deleted, a notification is sent to the chat saying who deleted it. Also, please keep in mind that once a photo is deleted, it cannot be restored.
Thank you for your feedback.
Was this page helpful?
Yes No
No, you cannot restore a picture that was deleted from an album.
Thank you for your feedback.
Was this page helpful?
Yes No
To rename an album:
1. Click the menu icon at the top of the chat screen > Albums.
2. Click the menu icon to the right of the album name > Rename album.
3. Enter a name for the album and click OK.
Note:
- You can enter up to 50 characters for an album name.
- The same album name cannot be used more than once in the same chat.
Thank you for your feedback.
Was this page helpful?
Yes No
The following restrictions apply to Albums.
- You can create a maximum of 100 albums per chat room.
- You can post a maximum of 1000 photos per album.
Thank you for your feedback.
Was this page helpful?
Yes No
Keep
Keep is a storage service that lets you save photos, videos, text, and files in LINE. You can also easily share your saved content with friends.
To check the content you have saved in Keep, click theFriends tab >Keep at the top of the screen.
For information on the storage period/capacity for Keep, see this Help article.
You can also use Keep to easily manage the content sent in Keep Memo.
Thank you for your feedback.
Was this page helpful?
Yes No
You can view your files stored in Keep with one of the following methods:
- Click the Keep icon from the main menu.
- Click the "…" icon > Keep.
- From the main menu, click the Friend icon > then click the Keep icon to the right of your name.
To check how much space you're using:
1. Click the "…" icon > Settings.
2. On the left side of the screen, click Keep.
Thank you for your feedback.
Was this page helpful?
Yes No
Most items can be saved in Keep for any length of time.
There is a storage period of 30 days only for files larger than 50MB. The number of days remaining will appear on these files every day in your item list in Keep.
Note: After a certain amount of time has passed, you will no longer be able to save items (e.g. photos, videos, or other files) that were sent in Keep Memo.
Keep has a storage capacity of 1 GB.
Item restrictions
• Photos and files: No restrictions
• Videos: Up to 5 minutes
• Text: Up to 10,000 characters
If you can't save something in Keep, check your available storage capacity.
Thank you for your feedback.
Was this page helpful?
Yes No
If you cannot upload files, please check the following:
- Check if you are over Keep's storage capacity of 1GB. Please allow for sufficient storage space in order to use Keep.
- Check whether the image file size is larger than 20GB or if the image quality is over 10,000 × 10,000 pixels. If the image exceeds those specifications, you will not be able to upload the file.
Thank you for your feedback.
Was this page helpful?
Yes No
If you cannot open files from the file list, please download it to your PC, then open the file.
Thank you for your feedback.
Was this page helpful?
Yes No
To send content saved in Keep to a chat:
1. From the main menu, click the Keep icon.
2. Select the content you want to send, then drag it to the chat list or chat room of your choice.
To send several contents at once:
1. Open the chat room you want to send the contents to.
2. Click the Keep icon at the top of the message entry field.
3. Choose the contents you want to send, then clickSend.
Thank you for your feedback.
Was this page helpful?
Yes No
You can pin items so they always appear at the top of a list in Keep.
To pin an item:
1. Click the menu icon at the top of the screen > Pin.
2. Select the item you want to pin.
3. Click Pin.
You can also pin an item from a list by right-clicking it and selecting Pin.
To unpin an item:
1. Right-click the item you want to unpin.
2. Click Unpin.
Thank you for your feedback.
Was this page helpful?
Yes No
Keep Memo is your own personal chat that only you can see.
Note: If you don't see the Keep Memo chat, update LINE to the latest version here.
Text, links, images, photos, videos, and other files sent in the Keep Memo chat will also be sent to Keep, where you can organize and manage them.
Note:
- Just sending content in your Keep Memo chat will not save it in Keep.
- For information on saving items from Keep Memo in Keep, see this Help article.
The Keep Memo chat cannot be renamed and its profile picture cannot be changed. Also, it does not have features like Note and Albums, and it cannot be deleted or duplicated.
Thank you for your feedback.
Was this page helpful?
Yes No
To save items that you sent in Keep Memo, use one of the methods below.
Saving an item from the Keep Memo chat:
Click Keep at the bottom of the item you want to save.
Saving an item from the Keep screen:
1. Click the Keep icon at the top of the screen.
2. Right-click the item.
3. Click Save in Keep.
Note: The "Save in Keep" option won't appear for items already saved in Keep.
If you pin an item or edit text in Keep, that content will be saved in Keep automatically. For more information about pinning items in Keep, see this Help article.
Thank you for your feedback.
Was this page helpful?
Yes No
Deleting items from the Keep Memo chat also removes them from Keep.
Note: Items that have already been saved in Keep will only be deleted from the Keep Memo chat.
To delete an item from Keep Memo:
1. Right-click the item you want to delete.
2. Click Delete.
Thank you for your feedback.
Was this page helpful?
Yes No
To open Keep, use any of the methods below.
• Click the Keep icon at the bottom of the main menu.
• Click Friends > the Keep icon to the right of your name.
• Click Chats > Keep Memo > the Keep icon at the top.
Thank you for your feedback.
Was this page helpful?
Yes No
To open your hidden Keep Memo chat:
1. Click "..." at the bottom of the main menu >Settings.
2. ClickChats.
3. From Hidden chats, clickKeep Memo >Display.
Thank you for your feedback.
Was this page helpful?
Yes No
To add content to Keep, follow the steps below.
To add photos/videos:
1. Click the Keep icon at the bottom of the main menu.
2. Click "+" at the top right of the screen > Upload Files.
3. Choose the photo, video, or file you want to upload.
Adding text/links:
1. Click the Keep icon at the bottom of the main menu.
2. Click "+" at the top right of the screen > Text.
3. Enter text or the URL for a link.
Thank you for your feedback.
Was this page helpful?
Yes No
To pin your Keep Memo chat at the top of your chat list:
1. Right-click the Keep Memo chat.
2. Click Pin chat.
Thank you for your feedback.
Was this page helpful?
Yes No
To check how much Keep storage is being used:
1. Click the Keep icon at the bottom of the main menu.
2. Click the options icon at the top of the screen > Settings.
Thank you for your feedback.
Was this page helpful?
Yes No
Letter Sealing
Letter Sealing is a feature that provides End-to-end encryption (E2EE) for chat room messages. E2EE is a communication system designed so that messages saved on our servers are encrypted and cannot be read by anyone except the sender and receiver of the message.
Once the sender and receiver have both turned on Letter Sealing, they will be able to start sending messages, but with added security.
If you use LINE for PC with Letter Sealing enabled on the smartphone version of LINE, you will be required to verify your identity the first time you send a message. For information on how to verify your identity, see this Help article.
Thank you for your feedback.
Was this page helpful?
Yes No
To use LINE for PC with Letter Sealing, make sure you have Letter Sealing turned on in the smartphone version of LINE, then verify your identity by following the steps below.
Note: You need to have your smartphone to complete the verification process.
1. Log in to LINE for PC.
2. Open a chat from theChats tab.
3. ClickVerify my identity to get a six-digit verification code.
4. Enter the six-digit verification code on the identity verification screen that appears in the smartphone version of LINE.
Thank you for your feedback.
Was this page helpful?
Yes No
If you're trying to verify your identity so you can use Letter Sealing on LINE for PC, but the verification code entry screen isn't appearing in LINE on your smartphone, restart the smartphone app and try verifying your identity again by referring to this Help article.
Thank you for your feedback.
Was this page helpful?
Yes No
Chat folders
Chat folders let you organize your chats into different categories. You can use the default folders that are available or create your own.
Default folders
These folders automatically categorize your chats into one of the five folders listed below.
Note: A folder may not appear if you don't have any chats to go in it.
• All: Displays all of your chats
• Friends: Shows 1-on-1 chats with your friends
• Groups: Shows your group chats
• Official accounts: Displays official account chats
• OpenChat: Shows all of your OpenChats
Creating new folders
You can create your own folders and organize your chats for any purpose (e.g. based on family, work, friends). For the steps to create new folders, see this Help article.
Thank you for your feedback.
Was this page helpful?
Yes No
To add a new chat folder:
1. To the right of your available chat folders, click the edit icon.
2. Click "+".
3. Enter a folder name, select the chats you want to add to the chat folder, and click Add.
4. Click "X".
Note: You can create up to 10 new chat folders.
Thank you for your feedback.
Was this page helpful?
Yes No
To reorder your chat folders:
1. On the right side of the chat folders tab, click the Edit button.
2. Click and hold a folder, then drag and drop it to your preferred location.
Thank you for your feedback.
Was this page helpful?
Yes No
To rename a chat folder:
1. Right-click the tab of the chat folder you want to rename.
2. Click Change folder name.
3. Enter a new folder name.
Note: Default folders (e.g. All, Friends, Groups, Official accounts) cannot be renamed.
Thank you for your feedback.
Was this page helpful?
Yes No
To add a chat to a chat folder:
1. Right-click the tab of the chat folder that you want to add a chat to.
2. Click Add chats to this folder.
3. Select the chat you want to add to the chat folder and click Add.
Note: You can add up to 100 chats to a chat folder.
Thank you for your feedback.
Was this page helpful?
Yes No
To move a chat to another chat folder, use one of the following methods.
• Select the chat you want to move, then drag and drop it in your preferred chat folder.
• Right-click the chat that you want to move, click Move to, and then click the name of your preferred chat folder.
Thank you for your feedback.
Was this page helpful?
Yes No
To move a chat from a folder you created to a default folder:
1. Right-click the tab of the chat folder that has the chat you want to move.
2. Click Remove chats.
3. Select the chat you want to move and click Remove.
Thank you for your feedback.
Was this page helpful?
Yes No
To delete a chat folder:
1. Right-click the chat folder you want to delete.
2. Click Delete folder.
Note:
- Default folders (e.g. All, Friends, Groups, Official accounts) can't be deleted.
- Any chats that are in a chat folder when it's deleted will automatically be moved to your default folders.
For the steps to turn the chat folder feature off, see this Help article.
Thank you for your feedback.
Was this page helpful?
Yes No
To enable or disable chat folders:
1. At the bottom of the main menu, click "..." > Settings.
2. Click Chats.
3. Under Chat folder, uncheck the box next to Enable chat folders to turn the feature OFF, or check it to turn the feature ON.
Note: Turning this feature off will reset all of your folder settings.
Thank you for your feedback.
Was this page helpful?
Yes No
Can You Use Line App As Text
Source: https://help.line.me/line/mac/categoryId/10000336/pc?lang=en
Posted by: browderhileace.blogspot.com
0 Response to "Can You Use Line App As Text"
Post a Comment